2.25.2016

Garden Shed Update

I can't believe I haven't posted since the end of 2014!  Shame on me.  Last year clearly got away from me in terms of blog posts, but I hope to be more consistent this year.  Isn't that my hope every year?

I want to start with a short post about our garden shed that we built in the fall of 2014.  Last year I got busy planting the area surrounding it (need a name for this part of the garden - the shed bed?  Na.) which included the construction of an herb garden made from scrap cedar.  I also painted the door purple. :)


Just look at the difference from Spring to late Summer. What a difference some foliage makes!


Here's a close-up of my oregano in the herb garden which produced really well in it's first year!

December was so mild that I was able to harvest kale and parsley for garnishes for Christmas dinner.

I am excited to see what thrives this coming growing season.

12.31.2014

Longest Post Ever

As usual I've procrastinated until the very last moment to post about all of the changes in our yard this year, and what big changes they were.  I already mentioned the wood shed we built in early Spring.  It's working out splendidly.  In fact it was home to a nest of robins this year and a chipmunk.

Shortly after completing the wood shed, Jeremy built two beautiful cedar raised beds to house our vegetable garden.  They are taller than our previous beds in an effort to discourage rabbits, and the bottoms are lined with hardware cloth to prevent rodents from tunneling up from underneath them.  They're 14 ft long by 3.5 ft wide.  Situated on a previously unutilized section of lawn, they receive full sun from about 10am until 3pm.  To say that I love them would feel like an understatement.

Below is a photo of the location of the old garden beds in relation to the new ones.  This photo was taken this Summer after the old beds had been abandoned and taken over by weeds.  In their heyday these were lovely beds, just not in the location or size that I ultimately wanted.

I should backtrack a little and say that while the construction of the beds was underway, we were embarking on another big landscaping redo.

You can't really tell from this photo, but this back berm surrounding our patio was huge. The fresh layer of mulch makes it look a lot nicer than it actually was.  It was often weedy and I could never figure out how to fully plant it.  There was just too much maintenance and it was out of scale with the rest of the backyard.  So we got a new tiller and started the enormous task of reducing the berm.

We hauled dirt from the berm to the new raised beds and used it to fill up the bottom half of them. We also used it to level out the bottom of our drainage ditch which had always been too steep and full of ruts.  It now has a flat bottom which makes it a lot easier to mow.  Here's a photo of it right after we'd reseeded it.

This is what the berm looked like after we'd reduced the size and graded the soil.   Much better. 

Here's what it looked like when it was all finished.  I planted catmint along the bottom which will look really nice once it fills in.  I also edged the berm with pavers to create a clean transition to the lawn. 

We also regraded and resized the garden bed along the east side of our house.  It looked too deep once we installed our fence and its depth made it hard to maintain.  These before photos show what it looked like after we started to regrade the area and removed the sumac that had become invasive.


Here are a couple of after photos of the same spot once it had been resized and replanted.  I still need to add edging to the bed along the fence.


We also redid the area on the east side of the patio.  That involved removing an overgrown dappled willow and replacing it with a fountain.  Here's what it looked like after we had removed all plantings and regraded.  

This photo shows it edged and reseeded.

Sometimes it's hard to believe the patio area started off looking like this.

And now it looks like this.


But we're not done yet.  One more major project took place this year.  Remember the old raised bed garden?  We started to remove the sod surrounding them and then deconstructed them.

To make way for this.

Yep.  We built a shed!  It will store all of my gardening tools and supplies.  The photos above were taken this month right after we finished it.  Well, it's mostly finished.  We still need to add some trim to the sides and back, paint the door, and paint the inside of the shed.  Those tasks will wait for warmer days.

It's amazing what you can accomplish with a good plan and a good carpenter.


It's been a year of exciting improvements and I can't wait to get outside this coming Spring and Summer and enjoy them all.

Happy New Year!


7.07.2014

Orioles

A young male orchard oriole.

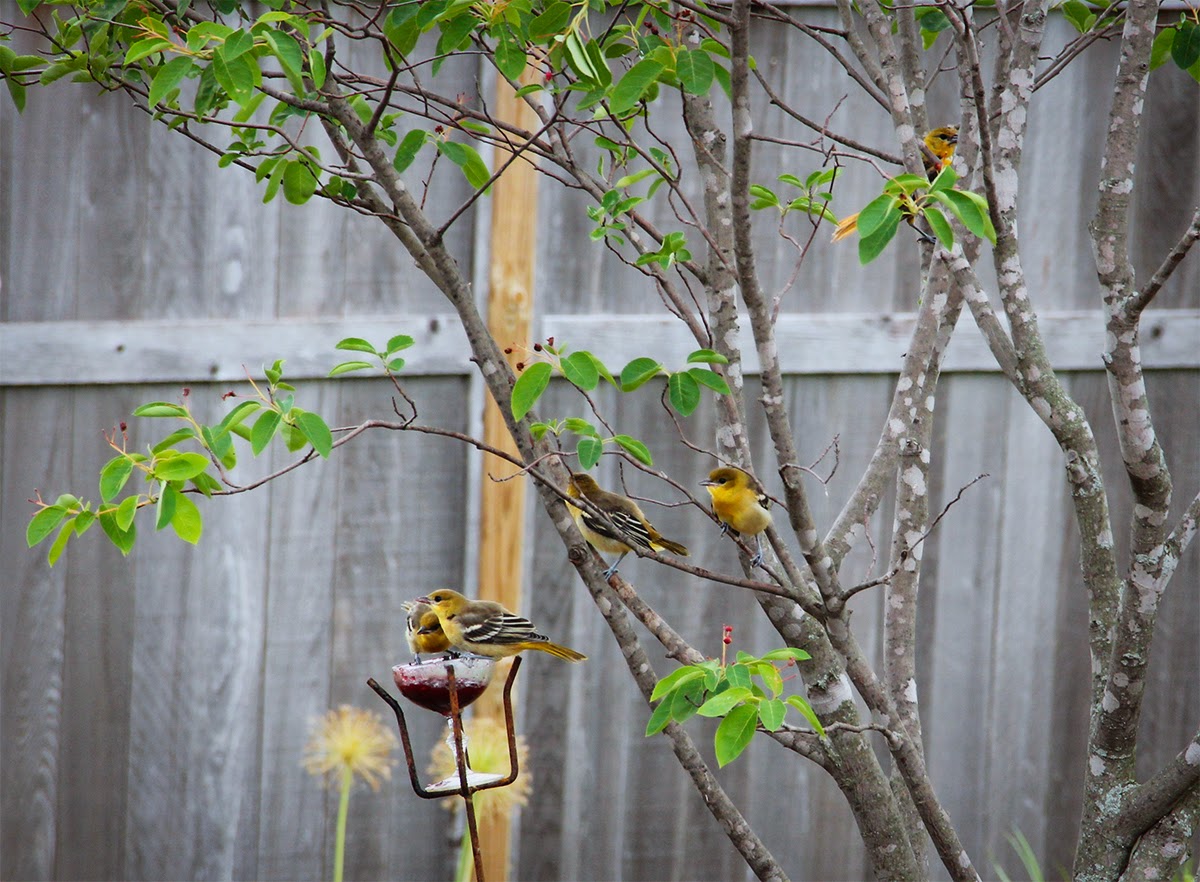
It's been a terrific year here for oriole activity.  I have never seen so many, and I've never before had the privilege of seeing fledglings.

This is the second year that orchard orioles have visited our yard. They are slightly smaller than the Baltimore orioles and have less black on their heads. They are also a bit more yellowish in color.
Female oriole grabs nesting material.


I attracted them with several jelly feeders placed throughout the backyard and the female returned multiple times daily to grab bits of twine that I'd woven through the sides of a hanging basket.

They disappeared for awhile from late May to mid June as they nested.  Then the female reappeared with four gorgeous little fledglings in tow.

Here are some photos of the fledglings with their mom.  They visit the jelly feeders several times a day. I hope they come back next year.
A tender moment between mom and baby.

All four fledglings coming to feast on jelly with mom.

Being fed a tasty jelly snack by mom.

Orchard oriole fledglings in serviceberry tree.

4.16.2014

How Much Wood Could a Woodchuck Chuck?

That woodchuck would have come in handy when we were unstacking and restacking our woodpile this Spring!

As you can see from this first photo, our new cedar woodshed is a big improvement over our old crooked wood rack.
New woodshed with old wood rack in background.
Cedar shake shingled roof.

We particularly enjoyed working on the shingled roof. Finding the right sized pieces was like putting together a big puzzle.


Resting in it's permanent home.


The top shelf will be used to store kindling and the vertical divider will separate newer wood from older, drier wood.

It took us about three days to build and we are very pleased with the final result. Some robins were equally delighted and promptly built a nest in the back corner of the shelf.

12.10.2013

But Wait, There's More!

I just came across several photos of a landscaping project we tackled back during late Summer in the west side of our yard.  Here is a photo of how it looked before.

We buried that winding paver path earlier in the Spring.  Even with a sod cutter, it was a lot of work.  As you can see, I'd already created a bed along the edge of the house on the left there as well as a few scattered plants along the fence.

After renting a sod cutter again to remove the lawn, this is what the same area looks like now.

 I am pretty amazed at what a difference a few plants and some fresh mulch can make.

 Here is one more shot that shows the view of my little mailbox garden from inside the gate.  I love how the neighbor's Aspen tree arches way over into our yard and provides some afternoon dappled shade.

12.08.2013

It's Beginning To Look A Lot Like Christmas

As I watch the snowflakes whirl around outside my window, it occurs to me that another year has almost slipped past and not a single peep from my blog this year.  So, in keeping with the season, here are a few photos from our annual trip to Aissen Tree Farm.
      It looks like Jeremy is hauling that tree for miles but really our truck is hidden behind some trees up ahead.

It's been a good year for us garden-wise and otherwise.  We have several fun garden projects planned for 2014 and I hope to document them here.  

Happy Holidays!

10.24.2012

Kiss Me Over The Garden Gate

Sounds like the title to an old-fashioned romance novel, doesn't it?

My husband and I were driving on a hilly river road in our small town in late August when I spied a beautiful flower garden in a sunny backyard and exclaimed quite eloquently, "Holy crap! What's that?!"  There, in a long bed lined neatly with field stone, grew a beautiful plant with long pink blooms that towered over the rest of the garden at roughly 10 ft tall!  I'd never seen it before and I just had to know what it was.

We drove home and I began my GPS'ing (Google plant sleuthing).  I've become quite a whiz at this, feverishly typing descriptive phrases to identify my latest mystery plant.

Finally, after searching in spurts for several days, I found what I was looking for.  Polygonum orientale, or it's much more romantic common name, 'Kiss-me-over-the-garden-gate'.

     I went back to the garden on another occasion to take this photo.

This link provides some good info on this charming annual.  I wonder if the owners would notice me creeping up into their yard to gather some seeds...


8.10.2012

My, Oh My

Well, so much for my hopes to post more consistently this year than the last.  Oops.  I blame the intense heat ...or something.  I am working on a post that I'll be sharing within the next month or so.  Until then, here are a few photos taken in the yard this year.


 Despite the drought that initially plagued our area in May and June, July brought sufficient rain that perked everything up nicely.  My black-eyed-susans and butterfly weed are having their best year ever.


The birds have not been as plentiful as previous years, perhaps due to the unusually hot and dry weather, but the usual suspects can be found visiting the bird garden daily.  The orioles are long gone.  The hummingbirds fill the void with their amusing antics as they chirp and fight over the coveted nectar feeder.

     Look deep into my eyes.  You will surrender all of your carrots.